- MongoDB 보안
- MongoDB 는 보안 관점으로 크게 5가지로 정리를 할 수 있으며, 해당 문서에서는 인증과 권한, 테스트한 내역만 작성
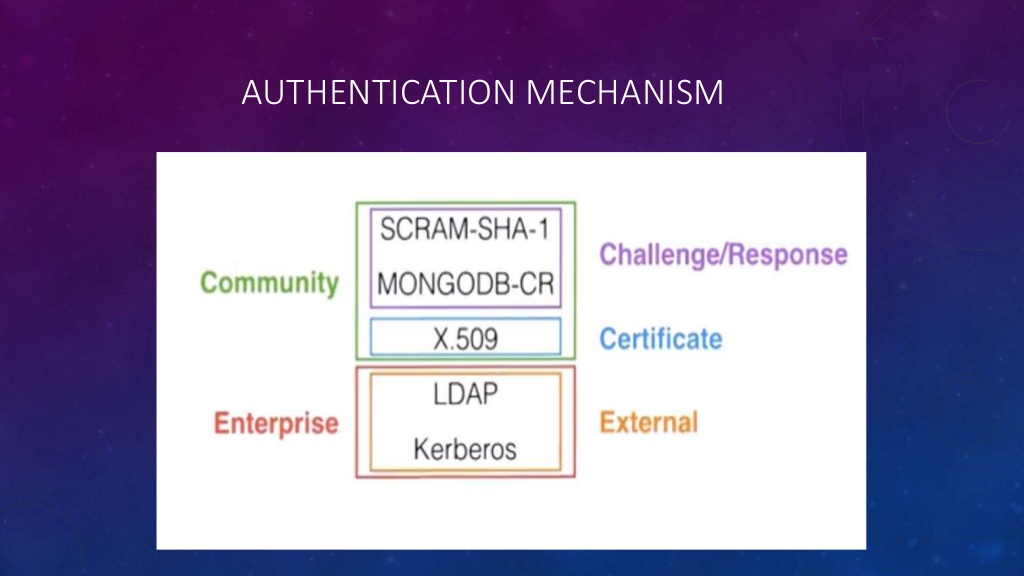
- 인증(Authentication)
- 권한(Authorization)
- 암호화(Encryption) - TDE - Mongo DB Enterprise 에서 제공
- 감사 (Auditing) - MongoDB Enterprise 및 Percona 제공
- 데이터 관리 (Data Governance) - 데이터의 일관성을 유지라 해당 서적에서는 언급 안함
- 인증(Authentication)
- 내부 인증
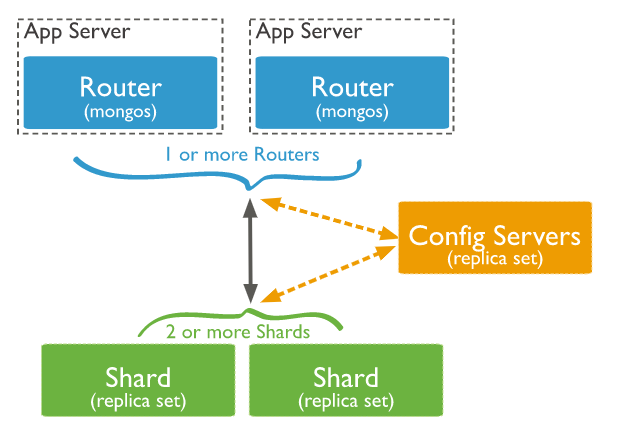
- MongoDB와 MongoDB 라우터 서버 간(레플리카 셋에서 각 멤버간)의 통신을 위해서 사용되는 인증
- 내부 인증은 키 파일과 x.509인증서 2가지 방식을 선택 가능
- 인증 활성화 하기 위해서 설정파일에서 인증과 관련된 옵션 활성화 해야 함
$ /etc/mongod.conf

security :
  authorization: enabled   # 내부 및 사용자 인증까지 모두 활성화(내부/사용자 인증을 개별로 설정 못함)

#key 파일 생성은 기존 문서로 대체 합니다.
#기존 key 파일 생성 및 auth 내용
  clusterAuthMode : keyFile
keyFile : /etc/mongod.key- keyFile은 평문의 단순 문자열로 구성된 비밀번호 파일을 MongoDB 서버(OS)가 내부 인증으로 사용하도록 하는 방식
- keyFile 생성할 때 주의점
- 해당 파일은 클러스터에 참여하는 모든 MongoDB가 공유해야함-동일한 파일을 모든 멤버의 서버에 복사해서 사용해야 함
- keyFile 은 MongoDB 서버 프로세스가 읽을 수 있어야 함
- keyFile의 접근권한은 반드시 600, 700으로 파일의 소유주만 접근할 수 있어야 함
- keyFile의 내용에서 공백문자는 자동으로 무시
- keyFile은 6개 이상 1024개 이하의 문자로 구성돼야 하며, Base-64셋에 포함되는 문자만 사용할 수 있음
- 사용자 인증
- MongoDB서버 외부의 응용 프로그램이 MongoDB 클라이언트 드라이버 이용해서 접속 시도할 때
- 사용자를 생성할 때 반드시 특정 데이터베이스로 이동해서 생성해야 함 > 인증 데이터베이스라고 함(Authentication Database)
- 여러 DB에 대해 권한을 가질 수 있지만, 인증 데이터베이스(로그인을 위한)는 하나만 가질 수 있음 (admin 에서 생성 하고, test 에서 또 권한을 주더라도 test를 인증하는 데이터베이스로 할수 없고 로그인할 때는 무조건 admin으로 먼저 접속)
- 활성화기 위해서 /etc/mongod.conf 파일을 수정. 클러스터 멤버 간 통신의 인증을 위해서 clusterAuthMode 및 keyFile 옵션을 추가 더 사용해야 함
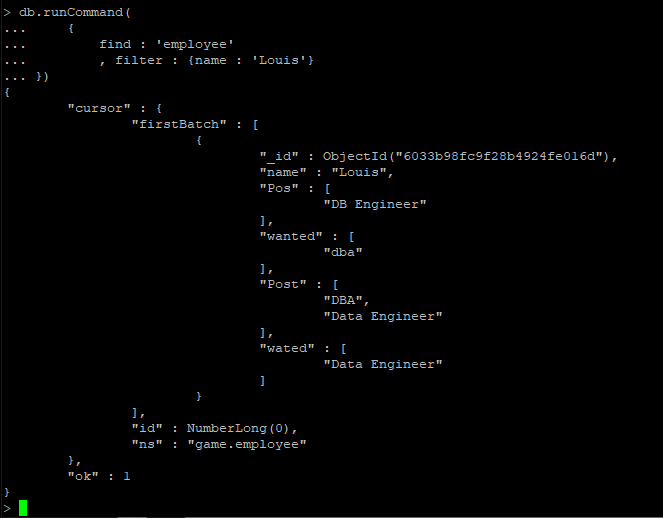
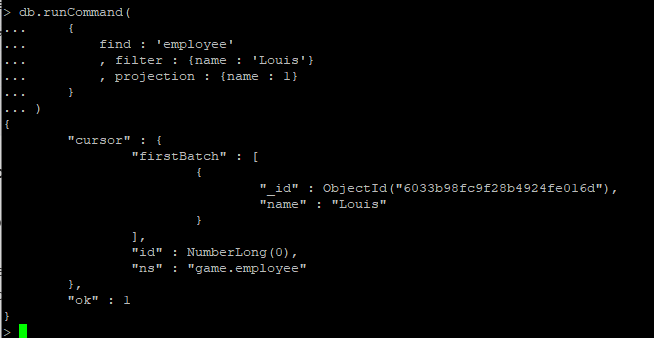
- db.system.users.find().pretty() 명령 으로 유저 정보를 확인 가능
- 동일한 계정명과 패스워드를 하더라도 다음과 같이 생성하면 두 계정은 mongoDB에서는 서로 다른 계정으로 인식함
- 만약 하나의 사용자 계정이 여러 데이터베이스 대해서 권한을 가지도록 한다면 다음과 같이 해야 함
단순 사용자 인증을 위한 설정

security:
   authorization : enabled
use mysns
db.createUser({user:"user",pwd:"password", roles:["readWrite" ] })
use myblog
db.createUser({user:"user",pwd:"password", roles:["readWrite" ] })
#유저 생성 여부 확인
show usersuse mysns
db.createUser({user:"user",pwd:"password", roles:[ "readWrite", {role:"readWrite", db:"myblog" } ] })
또는
use mysns
db.createUser({user:"user",pwd:"password", roles:["readWrite" ] })
db.grantRolesToUser("user", [{ role:"readWrite", db:"myblog" }])
생성된 유저 확인
db.system.users.find().pretty()- 외부 인증 방식
- LDAP나 Active Directory 를 이용해서 사용자 인증을 의미 하며 Enterprise 버전에서만 사용 가능
- LDAP 관련한 설명 블로그 참조 ( https://jabcholove.tistory.com/89 )
- Percona Server for MongoDB SASL (percona-server-for-mongodb-authentication-using-active-directory 설명 - https://www.percona.com/blog/2018/12/21/percona-server-for-mongodb-authentication-using-active-directory/ )
This article will walk you through using the SASL library to allow your Percona Server for MongoDB instance to authenticate with your company’s Active Directory server. Percona Server for MongoDB includes enterprise level features, such as LDAP authentication, audit logging and with the 3.6.8 release a beta version of data encryption at rest, all in its open source offering.
- 권한 (Authorization)
- 액션
- 명령이 처리되는 동안 발생하는 각 단위 작업을 나누어서 MongoDB의 명령들이 하나 이상의 단위 액션들의 집합으로 처리되는 개념
- 버전에 따라 미리 정의해 둔 액션의 종류는 매우 다양하고 개수도 많으며, 추가/제거되는 명령도 많기 때문에 MongoDB에서 직접 체크가 필요
- 최소 단위의 권한으로 일반적인 명령어를 실행하기 위해서는 여러 액션의 권한이 필요 (aggregate라는 명령어를 실행하기 위해서는 find / insert / bypassDocumentValidation이라는 3가지 액션이 필요)
- 내장된 역할(Role)
- MongoDB에서 내부적으로 default로 만든 role로 여러 액션들의 집합체
- ex) read 라는 내장된 롤에는 collStats, dbHash, dbStats, find, killCursors, listIndexes, listCollections 의 액션으로 만들어짐
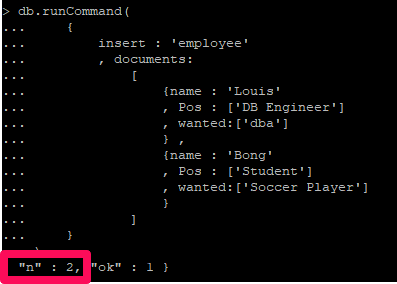
- mysns 데이터베이스에 대해서 readWrite 역할을 가지고 myblog 데이터베이스에 대해서 read 역할만 가지는 사용자 계정 생성
mongodb > use mysns
Mongodb > db.createUser({user:"mysns_user",pwd:"mypassword",roles:["readWrite",{role:"read",db:"myblog"}]})
cf ) User 생성 시 인증 DB를 admin 으로 하되, 권한은 DB 단위의 권한만 부여 되는지 여부
- 생성 시 아래와 같은 방법으로 생성 추가 가능
- 로그인 시 admin 으로 로그인만 가능. 그 외 부여된 권한에 대해서만 진행 가능
mongodb > use admin
mongodb > db.createUser({user:"testadmin",pwd:"testadmin!23",roles:[{ role:"readWrite", db:"test" }]})

또는

mongodb > db.createUser({user:"testadmin",pwd:"testadmin!23",roles:[]})
mongodb > db.grantRolesToUser("testadmin", [{ role:"readWrite", db:"test" }])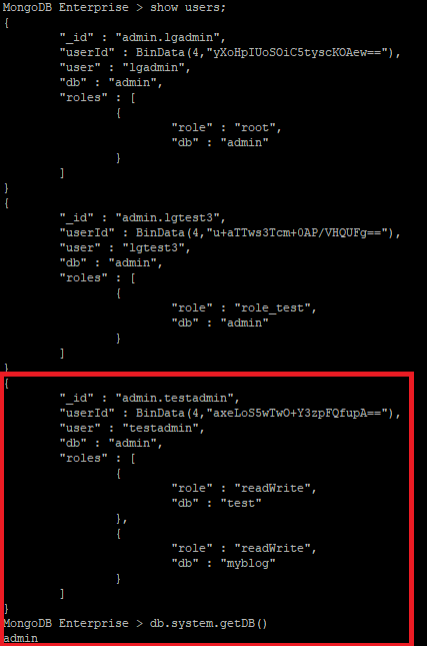
결론 : dbOwner ⊇ userAdmin ≠ dbadmin Superuser > Superuser > root : readWriteAnyDatabase, dbAdminAnyDatabase, userAdminAnyDatabase, clusterAdmin, restore, and backup combined. |
| Role type | Role | Role 설명 | 제외되는 role | 상세 내역 | 확인 사항 |
| Database User Roles | read | 읽기 | system collection 제외 | changeStream, collStats, dbHash, dbStats, find, killCursors, listIndexes, listCollections 등과 같은 명령어를 처리 | |
| readWrite | 읽기 + 쓰기 | system collection 제외 | read에 해당하는 명령어에 convertToCapped, createCollection, dropCollection, createIndex, dropIndex, emptycapped, insert, remove, renameCollectionSameDB, update 와 같은 명령어를 처리 | ||
| Database Administration Roles |
dbAdmin | indexing, gathering, statistics 등 역할을 할 수 있으며 | user와 role에 대한 management는 제외 | collStats, dbHash, dbStats, find, killCursors, lisstIndexes, listCollections 및 dropCollection, createCollection on system.profile only |
기술PM : dbAdmin + readWrite 권한 부여 |
| dbOwner | readWrite + dbAdmin + userAdmin | ||||
| userAdmin | 해당 DB에 대한 user의 roles를 생성하거나 변경을 수행하며, admin에 대한 userAdmin 권한을 받았을 경우 superuser를 생성 가능 | WARNING It is important to understand the security implications of granting the userAdmin role: a user with this role for a database can assign themselves any privilege on that database. Granting the userAdmin role on the admin database has further security implications as this indirectly provides superuser access to a cluster. With admin scope a user with the userAdmin role can grant cluster-wide roles or privileges including userAdminAnyDatabase. |
changeCustomData changePassword createRole createUser dropRole dropUser grantRole revokeRole setAuthenticationRestriction viewRole viewUser |
||
| Cluster Administration Roles |
clusterAdmin | 클러스터에 대한 최대 권한 부여자 clusterManager + clusterMonitor + hostManager + dropDatabase 권한(action) |
dbOwner 가 cluster권한 포함 ㅇㅕ부(포함한다면 ㅎㅐ당 권한 사용 안함) dbadmin > clusterManager 이다면 dbadmin만 pm에게 권한 부여 |
||
| clusterManager | config, local database에 접속할 수 있는 권한 cluster action 에 대한 management와 monitoring을 제공 |
|
|||
| clusterMonitor | Monitor에만 국한되며 read only 의 access 보유 |
|
|||
| hostManager | 각각의 서버에 대한 monitor와 manage 역할을 수행 |
|
|||
| Backup and Restoration Roles | backup | mongodump 등으로 backup 수행 | |||
| restore | mongorestore 등으로 restore 수행 | system.profile collection data는 제외 | |||
| All-Database Roles |
readAnyDatabase | ||||
| readWriteAnyDatabase | |||||
| userAdminAnyDatabase | |||||
| dbAdminAnyDatabase | dbAdmin 과 동일한 권한(local and config 제외) | ||||
| Superuser Roles | root | superuser 권한 | restore 제외라고 어떤 블로그에 공유되었지만, 공식 문서에는 restore 권한도 포함 되어 있음 (The root role includes privileges from the restore role.) |
|
|
| Internal Role | __system | 어떠한 database any object에 any action을 취할 수 있으나, 일반적으로 사람들에게 지정되는 것이 아니라 application이나 human administrators 에게 부여되는 권한이다. |

- 사용자 정의 role
- 사용자가 자신의 서비스나 요건에 맞게 새로운 역할을 정의해서 사용할 수 있도록 가능
- 2가지 범위를 가짐 > 사용자 정의 역할을 어느 데이터베이스에서 생성했느냐에 따라 구분
- 전역 역할
- admin DB에서 생성하면 전역 역할
- 데이터베이스 단위 역할
- admin DB이외에서 생성하면 해당 DB 단위로만 역할을 부여
- db.createRole() 로 생성 db.grantPrivilegesToRole() / db.revokePrivilgesFromRole() 로 제거
- 내장된 역할 또는 이미 정의된 역할을 부여하는 방법은 db.grantRolesToRole() 과 db.revokeRolesFromRole() 로 추가 제거가 가능
MongoDB > use admin
MongoDB > db.createRole({
   role: "dev_mysns".
   privileges: [
     { resource: { db: "mysns", collection: ""}, actions: ["find", "update", "insert", "remove"]},
     { resource : {db: "myblog", collection: ""}, actions: ["find"]}
   ], roles: []
})

MongoDB > use admin
MongoDB > db.createRole({
   role: "dev_mysns",
   privileges: [],
   roles: [
      {role : "readWrite", db:"mysns"}
      ,{role : "read", db:"myblog"}
   ]
})- 정의된 롤 확인
MongoDB > use admin
MongoDB > db.system.roles.find().pretty()- 유저 생성 및 사용자 정의 롤 부여
MongoDB > use admin
MongoDB > db.createUser({user : "user", pwd: "mypassword", roles:["dev_mysns"] })
- 테스트 내역
- 유저 생성 및 접속 체크
# gadmin root admin (DB : admin)

MongoDB Enterprise > use admin
switched to db admin

MongoDB Enterprise > db.createUser({user:"gadmin",pwd:"gadmin",roles:["root"]})
Successfully added user: { "user" : "gadmin", "roles" : [ "root" ] }

# test db book collection document
MongoDB Enterprise > use test
switched to db test

MongoDB Enterprise > db.book.insert({"name":"mongodb", "author":"hyungi"})
WriteResult({ "nInserted" : 1 })

MongoDB Enterprise > show dbs
test 0.000GB

MongoDB Enterprise > db.book.find()
{ "_id" : ObjectId("5ddb78f35f326d0194f85cbc"), "name" : "mongodb", "author" : "hyungi" }

# test DB lgtest readWrite
MongoDB Enterprise > use test;
MongoDB Enterprise > db.createUser({user:"lgtest",pwd:"lgtest!23",roles:["readWrite"]})
# test2 DB lgtest2 readWrite
MongoDB Enterprise > use test2
MongoDB Enterprise > db.book.insert({"name":"python", "author":"aca"})
MongoDB Enterprise > db.createUser({user:"lgtest2",pwd:"lgtest2!23", roles:["readWrite",{role:"readWrite",db:" test"}]})

# user
MongoDB Enterprise > show users

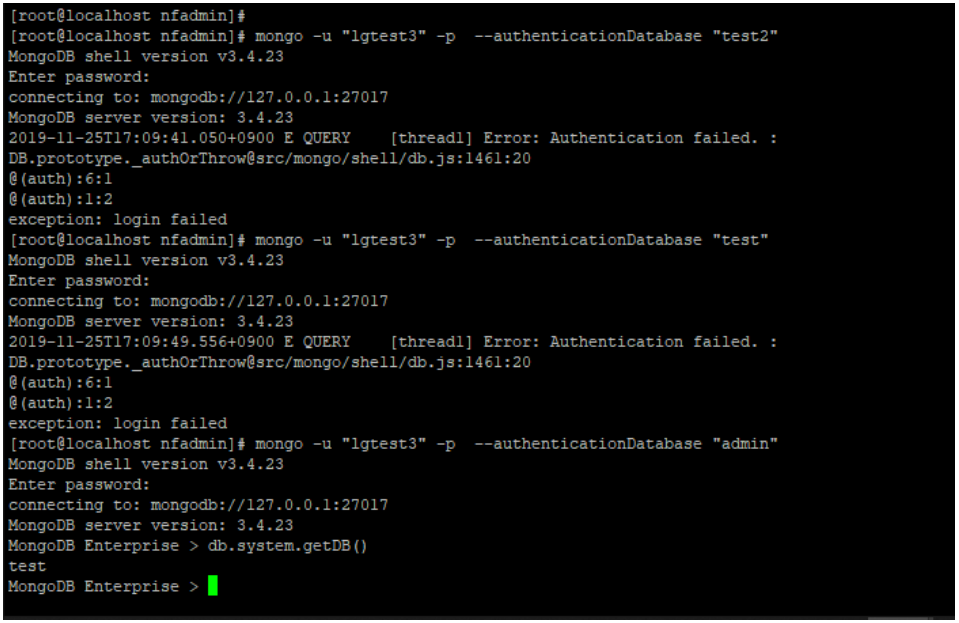
- 인증 DB는 test2 로 생성하였기 때문에, test DB로 로그인 인증 시도 시 실패 확인

- 기존 인증 DB인 test2 로 접근은 가능 확인
- 로그인 후 로그인 한 dbs 확인 시 test 로 확인이 되어, 이 부분에 대해서는 체크가 필요 ( db.system.getDB() ) 로 확인 가능

- admin 으로 다시 로그인 후 확인했더니 test 로 접속

- Role Test
MongoDB Enterprise > db.createRole({
  role: "role_test",
  privileges: [
    { resource: { db: "test", collection: ""}, actions: ["find", "update", "insert", "remove"]},
    { resource : {db: "test2", collection: ""}, actions: ["find"]}
  ], roles: []
})
MongoDB Enterprise > db.system.roles.find().pretty()- 다른 DB에서는 role 부여가 안되고 admin 에서만 부여가 되는 것을 확인
MongoDB > use admin
MongoDB > db.createUser({user : "lgtest3", pwd: "lgtest3!23", roles:["role_test"] })
MongoDB > db.book.insert({"name":"mongodb2","author":"bkkim"})
MongoDB > db.book.insert({"name":"mysql2","author":"bkkim"})- 인증 DB는 admin 하지만 권한들은 test(read/write),test2(read)

- 당연히 인증은 admin 만 되고 막상 접속하면 db는 test 로 접속되어 있음
- 부여한 롤은 시스템 정보를 모르고 있기에 알고 있는 정보로만 find 해야함...
- collection / dbs 정보 들을 확인할 수 없음

- role 은 정상 동작
- userAdmin role
- userAdmin 은 readWrite 등의 dml 권한은 없지만, 유저 권한 부여 등은 가능
- 해당 부분에 대한 테스트
MongoDB Enterprise > use test
MongoDB Enterprise > db.createUser({user:"useradmin",pwd:"useradmin!23",roles:["userAdmin"]})
$> mongo -u "useradmin" -p --authenticationDatabase "test"
Test 내역
|
- dbs / collections 확인 불가
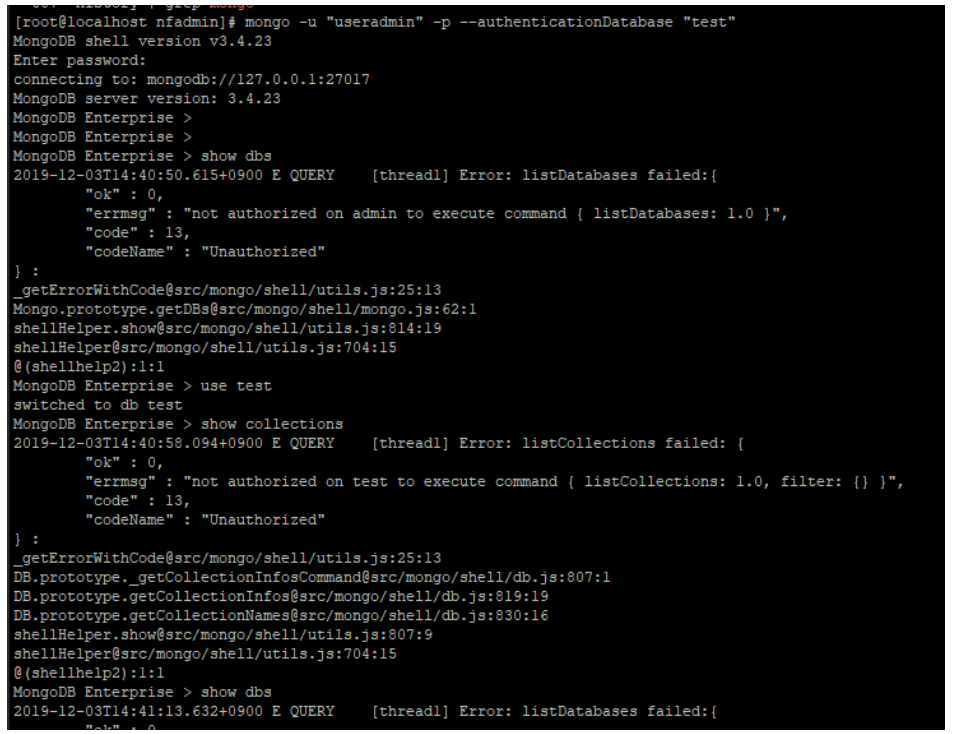
- find / insert 진행 불가

- 유저 생성 권한 부여 가능

- dbAdmin Role
- dbAdmin 은 인덱싱 등 통계 수집같은 관리 작업을 수행
- 참고로 아래 테스트는 userAdmin 권한을 가진 useradmin 계정으로 권한을 부여 (userAdmin은 dbAdmin 권한을 부여 가능)
MongoDB Enterprise > use test
MongoDB Enterprise > db.createUser({user:"dbadmin",pwd:"dbadmin!23",roles:["dbAdmin"]})
$> mongo -u "useradmin" -p --authenticationDatabase "test"
|
- userAdmin을 가진 계정이 dbAdmin 의 롤을 가진 유저 생성 가능
- userAdmin 은 계정 생성 및 user 생성 되었는지 확인 가능

- db 조회는 안되지만, collection 조회는 가능
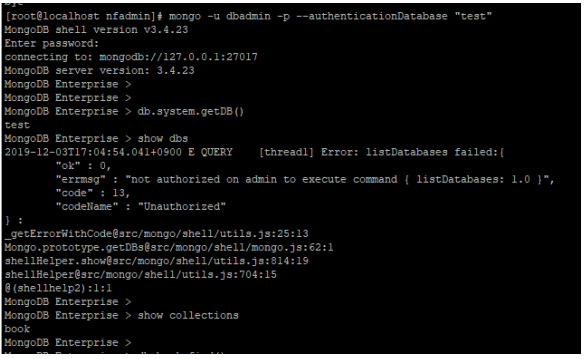
- find 및 insert 불가

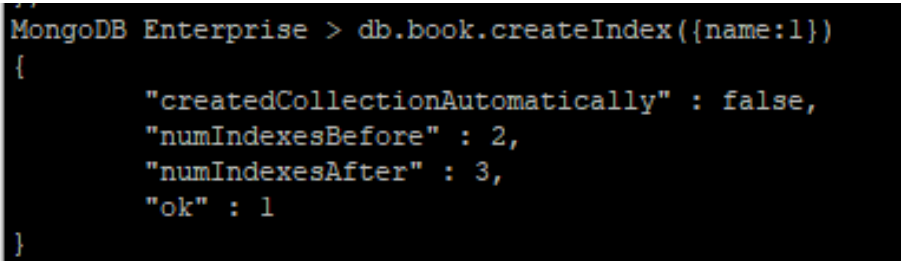
- index 생성 가능
- 유저 생성은 불가
- 관리의 관점에서 진행하기 위해 dbAdmin을 생성하여 사용

- dbOwner role
- dbOwner 은 readWrite, dbAdmin, userAdmin role 을 보유하며, DB 관리 조치를 수행 가능
- 참고로 아래 테스트는 userAdmin 권한을 가진 useradmin 계정으로 권한을 부여 (userAdmin은 dbOwner 권한을 부여 가능)
- 더불어 test2 DB 에서는 계정 추가가 안되는 것을 확인(참고로 useradmin는 test에 대해서만 userAdmin 권한을 보유)
MongoDB Enterprise > use test
MongoDB Enterprise > db.createUser({user:"dbowner",pwd:"dbowner!23",roles:["dbOwner"]})
$> mongo -u "dbowner" -p --authenticationDatabase "test"
|
- userAdmin을 가진 계정이 dbOwner 의 롤을 가진 유저 생성 가능
- userAdmin 롤을 가진 계정은, 계정 생성 및 user 생성 되었는지 확인 가능
- userAdmin 는 자신이 할당 받은 DB에 대해서만 권한 부여가 가능


- db 조회는 되지 않지만 collection 조회는 가능
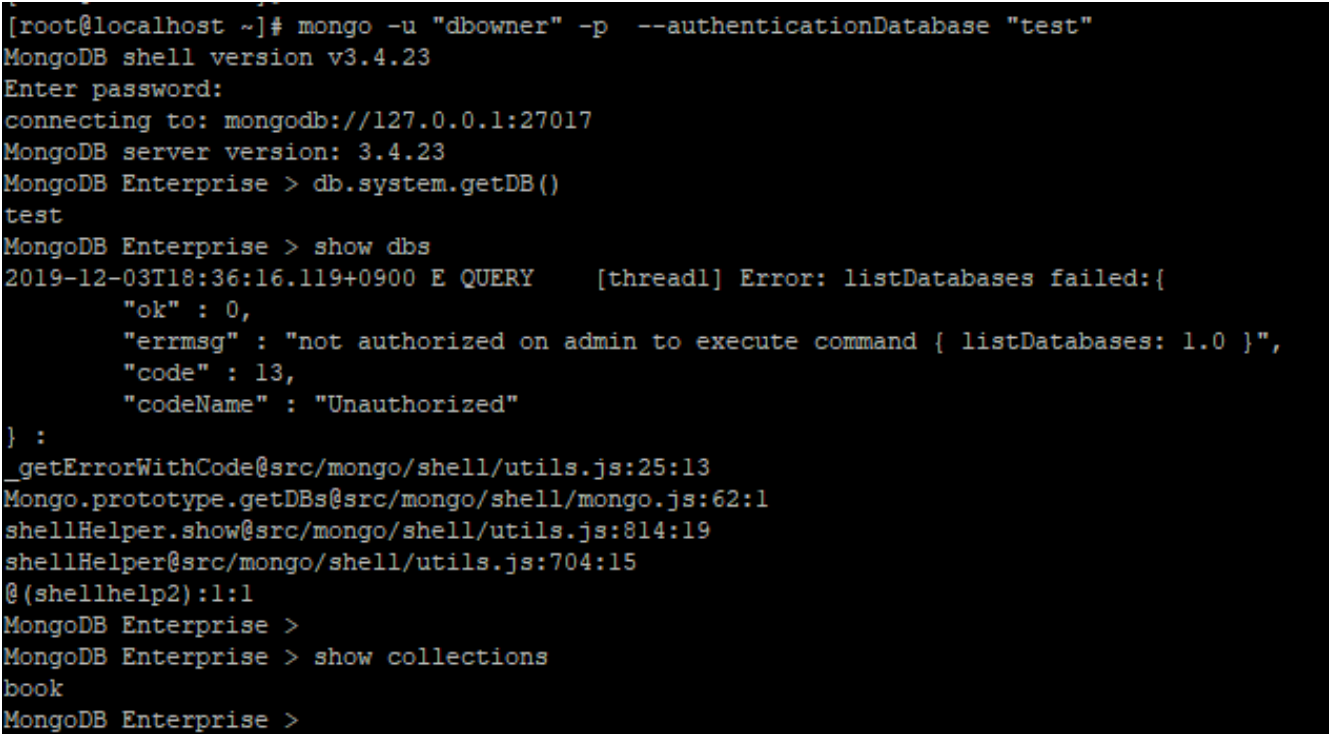
- collection 내 Document 조회도 가능하며, Insert 도 가능
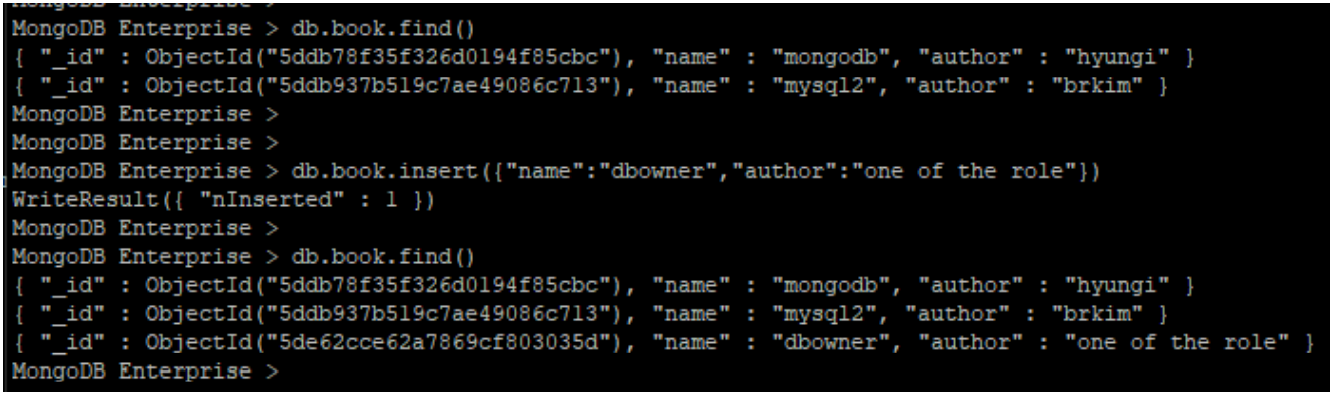
- Index 생성 가능하며, 다른 유저 또한 생성 가능

결론
- 인증 DB로 로그인 가능
- userAdmin의 권한은 함부로 부여 해서는 안됨
- 자기 자신이 무언가를 하기는 힘들지만, 자신이 가진 권한으로 상위 권한을 부여 가능(dbOwner라는 권한을 부여하여 자신의 DB 컨트롤 가능)
- dbAdmin 권한은 Insert 권한이 없는 그저 관리의 목적으로 사용될 수 있지만, drop권한이 있어서 잘 숙지하고 권한 부여 해야 함
- dbOwner 권한은 해당 DB의 최 상위 권한이지만, userAdmin과 함께 Admin DB에만 부여 안한다면 QA DB셋팅 시 개발사에게 권한 위임의 용도로 유용
- 운영 DB에서는 readWrite 권한이면 충분
- 가장 중요한 것은 DB Schema 별로 최대 dbOwner까지만 부여하고 Admin DB에는 절대 부여하면 안됨
반응형
'MongoDB > MongoDB-Study_완료' 카테고리의 다른 글
| [MongoDB] [Study11] 모델링 (0) | 2021.04.16 |
|---|---|
| [MongoDB] [Study-10] Lock & Transactions (0) | 2021.04.16 |
| [MongoDB] [Study-9] Index (0) | 2021.04.16 |
| [MongoDB][Study-8] Aggregation (0) | 2021.04.16 |
| [MongoDB][Study-7] Find / FindAndModify / Cursor (0) | 2021.03.28 |